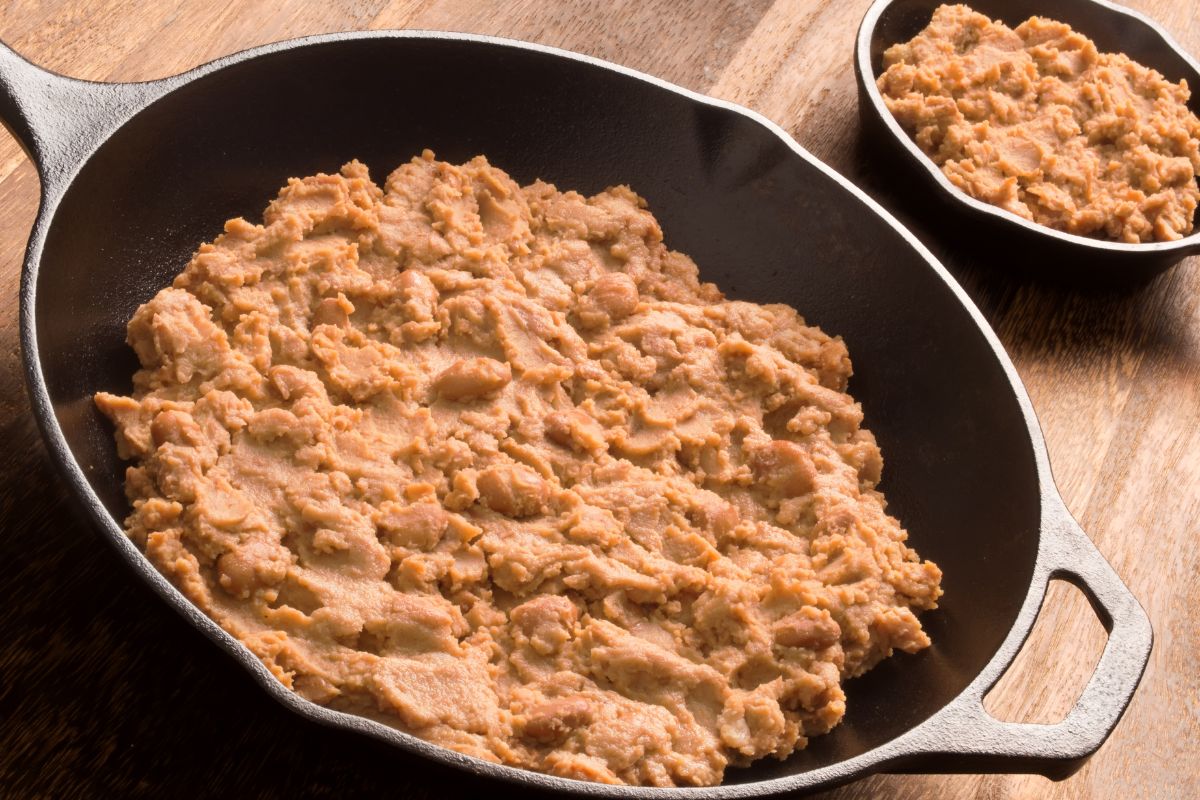
After all, the can offers a thick dollop of brown beans, which is worlds away from the refried beans you’ll get in a Mexican restaurant. Those beans are smooth and creamy, with plenty of taste and texture.
Thankfully, though, there are a few different tips and tricks you can use that will allow you to enjoy your canned refried beans at home in the smooth, luxurious style that you’d get in a restaurant!
To put it simply, the best way to transform your canned refried beans is by thinning them out with some cream, as well as additional spices to them that have been cooked in fat.
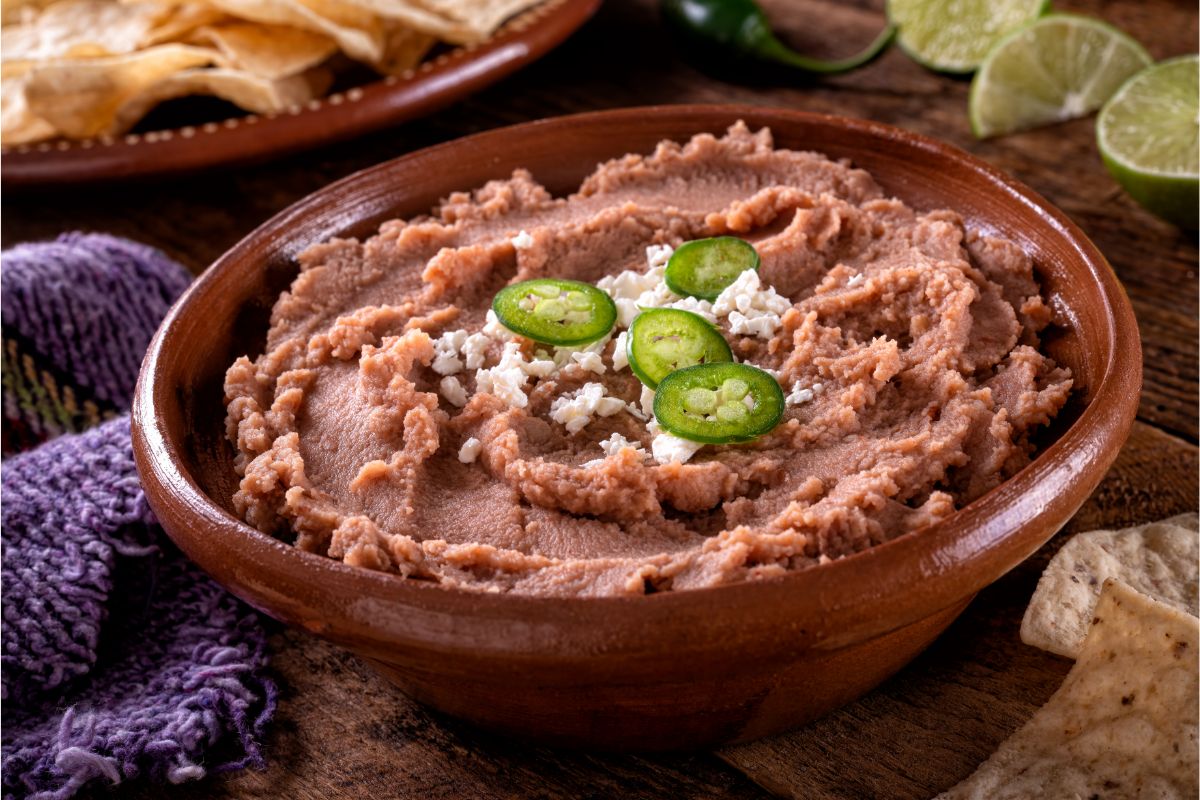
Finally, add even more flavor with the garnish of cilantro, jalapenos (for extra spice!), and cheese.
However, there are so many more tips and tricks to learn that will make your canned refried beans taste like they’re from a Mexican restaurant, and we’ve got all the answers you need in our delicious guide below.
In our article, we’ve got 5 different tricks for transforming your canned refried beans, as well as stovetop and microwave guides to altering them. Read on!
5 Tricks To Make Canned Refried Beans Taste Restaurant-Quality
There are a few different tricks that you can use to transform your canned refried beans into something that tastes like it came from a proper Mexican restaurant.
We recommend trying all of these steps to get the best overall results, rather than just using one of two, and it’s best that you try them in the order we’ve covered them in!
1. Thinning Your Refried Beans
When you open a can of refried beans at home, you’ll immediately notice that they’re nothing like the smooth and creamy treats you’ll get served in a Mexican restaurant.
Instead, you’ll find an extremely thick dollop of beans in the can, and they slop out as a mass. Even worse, they remain thick when you’re cooking them, never loosening them up and turning smooth.
As a result, you’ll want to make your refried beans a lot thinner and smoother, allowing them to be runny so you can better dip your food in them. Nobody wants to be dipping their tortilla into a thick, singular mass of beans!
The solution is to thin your canned refried beans, and this is thankfully an easy process! You can thin your beans by adding any liquid to them, which will instantly make them looser and runnier.
You’re spoiled for choice when it comes to thinning liquids. For example, water is a typical pick, but you can also use milk or cream. Additionally, half and half works, as does vegetable broth, buttermilk, and chicken broth.
Meanwhile, you can even thin the beans with semi-liquids, which still do the job! For example, something like crema will thin them, as will sour cream.
Of course, you can’t add too much liquid, otherwise you might overdo it. As a result, for every 30 ounces of canned refried beans, it’s best to add at least 1 cup of your chosen liquid.
Follow this rule, heat and stir your beans, then see if they’re as thin and runny as you want. If they aren’t, add a bit more liquid until they are!
2. Get Smooth And Creamy Beans
Of course, when you have refried beans in a restaurant, they’re not only thin but really creamy too. In fact, it’s one of the qualities that makes them so delicious!
As a result, you’ll want to make your canned refried beans at home perfectly creamy too, so that they simply melt in your mouth.
The best way to do this is to thin the beans out with a creamy liquid, rather than a runny liquid. Using heavy cream to thin your refried beans is a great tactic.
On the other hand, using thinners like water simply won’t give them the deliciously creamy consistency.
As you’d imagine, heavy cream is ideal for adding creaminess. Milk can make it light and relatively creamy, as can half and half, but heavy cream is going to give you the most luxurious creaminess.
You might think that something like buttermilk or sour cream will also make it creamy, and you’d be right, but that creaminess comes at a cost!
You see, sour cream has such a strong flavor that it will alter the taste of your beans, making them sour. Unless you want sour beans, use heavy cream instead, because it’ll add creaminess while retaining the same great taste!
3. Adding Flavorful Fat
While it might not be your first guess, adding fat to your canned refried beans will also make them taste a lot closer to what you’d get served in a restaurant.
Although it’s not something you want to eat a lot of, you’ll find that fat gives your beans plenty of extra flavor and texture, making them feel a lot fuller in your mouth.
There are plenty of different types of fat that restaurants use to add flavor and fullness to their refried beans.
For example, butter or lard are common fats, but some places will even use bacon grease or bacon fat for the same effect. However, those options won’t be great for vegans or vegetarians, so something like vegetable oil or olive oil is a great replacement.
If you don’t want to add fat to your beans though, don’t worry! You can make up for it by adding extra spices.
However, if you are adding fat, then you shouldn’t simply add your chosen fat to the beans on its own! Instead, you should use it to bring extra flavor out of another additional ingredient…
4. Bloom Your Added Spices
Another way to get your canned refried beans tasting closer to restaurant quality is by adding extra spices to them, which will bring all kinds of extra flavors and warmth.
However, the best way to add spices to your beans is by “blooming” them in your chosen fat. What does this mean? Well, let us explain.
To “bloom” a spice simply means to heat or toast it before adding it to your dish, blooming its potential flavors. There are different things you can heat them in, but we’d recommend blooming the spices in your fat for these beans.
Since you’re already adding fat to them, it’s an ideal opportunity to bloom your spices in a unique and flavorful way. The fat will help release all the oils from your spices, which in turn makes them far more flavorful!
Of course, which spices you choose to add are entirely up to you. We recommend spices like chili powder and cumin, which are common spices for taco seasoning. However, other great options include cayenne pepper, garlic powder, and onion powder.
5. Adding Final Garnishings
Finally, adding plenty of garnishes to your refried beans will help them to taste a lot closer to what you’d expect from a restaurant. After all, a restaurant will always bring you beans with a selection of delicious garnishes on top – you’re never just getting the beans!
Naturally, there are loads of different garnishes that you can choose from. Rather than use them all, simply pick your favorites! Also, it’s a good idea not to overload the beans with garnishes, rather keep it simple and small.
Shredded or crumbled cheese is a good garnish to start with, because it adds lots of cheesy flavor to the beans, as well as making them feel creamier too.
Cilantro is a great herb to add to the beans, too, because it adds freshness to the dish, as well as a subtle hint of citrus tang that pairs perfectly with the spiciness.
Meanwhile, speaking of spiciness, you can always add some slices of jalapeno pepper to the beans too! For spice lovers, this added layer of spiciness is a must.
Salsa is also a great garnish,and you can pick which type. For example, salsa verde adds sweetness and tanginess, while fruit salsa adds fruitiness and tomato salsa add zest.
How To Use A Stovetop To Make Canned Refried Beans Taste Restaurant Quality
Now that we’ve looked at the different tips and tricks you can use to make your canned refried beans taste more like the delicious dish that you’d get served in a Mexican restaurant, it’s time to look at the actual recipe and process of putting all those tips together.
For this recipe, we’ll be using a stovetop and a frying pan/skillet or a medium saucepan.
Step One: Heating Fat Or Oil
To start with, place your chosen pan over the stovetop and set it to a medium-high level of heat. Add your chosen type of fat, or oil, to the pan and let it start to heat.
If you’re going for a refried bean dish that’s free from fat, you’ll want to add more spices later on in order to make up for the missing flavor!
Step Two: Blooming Your Spices
Once your hot fat or oil has begun to sizzle in the pan, then it’s time to add your spices. Whichever spices you’ve selected, add them into the pan and lower the heat of the stovetop to just medium.
Leave the spices to cook in your fat or oil, stirring the mixture for a few minutes to ensure that it’s all working together.
Soon enough, your spices should bloom in the fat or oil, bringing out their extra flavors and spiciness. You’ll be able to tell that they’ve bloomed when you get hit with a lovely new aroma!
Step Three: Adding Extras
Now that your spices have bloomed, you can add some additional extras into the mix if you want. For example, though you might be garnishing the dish at the end with some jalapeno slices, you can add a few now to add extra spiciness to the beans.
Similarly, you can smash some garlic cloves and add them to the dish too for extra flavor.
Whatever you pick, add them into the pan’s mixture and then lower the heat down to a low level. Leave the additions to cook for about 3 minutes, stirring every now and then.
Step Four: Adding Your Refried Beans
It’s finally time for you to add the key ingredient itself: canned refried beans! Open your can and add it to the pan, stirring it thoroughly into all the spices and fat.
Step Five: Adding A Thinner
The next step is to add your chosen thinner to the mix, so that it will thin out the thick mass of refried beans and make them closer to the runny consistency of a restaurant.
If you’re using something very liquid-like, such as water, then it’s definitely going to make your refried beans runnier and thinner. However, it’s a better idea to use a liquid that’s a bit thicker, such as heavy cream.
This is because these will make your refried beans really creamy too, which restaurant beans are.
Whatever you add, make sure to stir it thoroughly into the ingredients.
Remember, if you’re going to be using a 30 ounce serving of canned refried beans (the typical size of a can of them), then you’ll want to add at least 1 cup of your chosen thinning liquid.
Step Six: Thinning The Beans
Now cover your pan with a lid, before leaving its mixture to heat on a medium-low level of heat for 5-6 minutes.
By that point, your thick mass of beans should start to thin out, with their cream bubbling.
Remove the lid from the pan and start stirring the cream more thoroughly into the beans, which is something you’ll only be able to do now that the beans have warmed up.
If the cream isn’t stirring into the beans easily, add a hint more.
Finally, put the lid back on.
Step Seven: Finishing The Creaminess
There’s still a little more to do until your beans are properly incorporated with the cream, so lower your heat to a low level and continue cooking the beans and cream for 5 more minutes.
When the beans are bubbling and hot, remove the lid and add a hint of lime juice, before stirring the mixture again.
Once you see that the cream is fully stirred in, put the lid back on and let the mixture heat for a final extra 2 minutes.
Step Eight: Dishing Up
With that all done, turn the heat off and carefully remove your pan, before pouring it mixture into a bowl.
Step Nine: Adding Garnishes
Now is your chance to add your chosen garnishes, such as cilantro, shredded or crumbled cheese, salsa, jalapeno slices, or anything else you like.
When done, serve however you like! For example, you can enjoy it with tortilla chips and sour cream.
How To Use A Microwave To Make Canned Refried Beans Taste Restaurant Quality
You don’t have to use a stovetop to transform your canned refried beans into restaurant-quality, because you can also use a microwave!
Step One: Preparing The Microwavable Bowl
To begin with, get a microwavable bowl that’s fit to be used in the microwave.
Open your can of refried beans and dispense them into the bowl. Once you’ve done that, add half a cup of one of these liquids: cream, half and half, milk. Cream will give your creamier beans. Stir the liquid thoroughly into the beans.
Step Two: First Dose Of Microwaving
Microwave your mixture for 90 seconds, then carefully remove the hot bowl from the microwave.
Step Three: Adding Spices
Being careful not to burn yourself on the bowl, add any spices you want into the mixture of beans and liquid. Stir them thoroughly into it.
Step Four: Second Dose Of Microwaving
Carefully put the microwavable bowl back into the microwave and heat it for another 90 seconds. By the end, the beans should be hot and you should be able to easily stir your chosen liquid into them.
Step Five: Adding Garnishes
Without burning yourself, remove the microwavable bowl and add whatever garnishes you want to the mix, such as shredded cheese or salsa. For extra spice, add jalapeno slices.
Step Six: Enjoy!
Enjoy your restaurant-quality refried beans! Make sure to let them cool down a little first.
Serving Your Refried Canned Beans
Once you’;ve got your restaurant-quality refried beans, it’s time to enjoy them! While you can eat them on their own, there are plenty of ways to enjoy this delicious dish.
Mexican Bean Pizza
For example, you can add the beans to a tortilla with some other toppings, giving you a Mexican bean pizza.
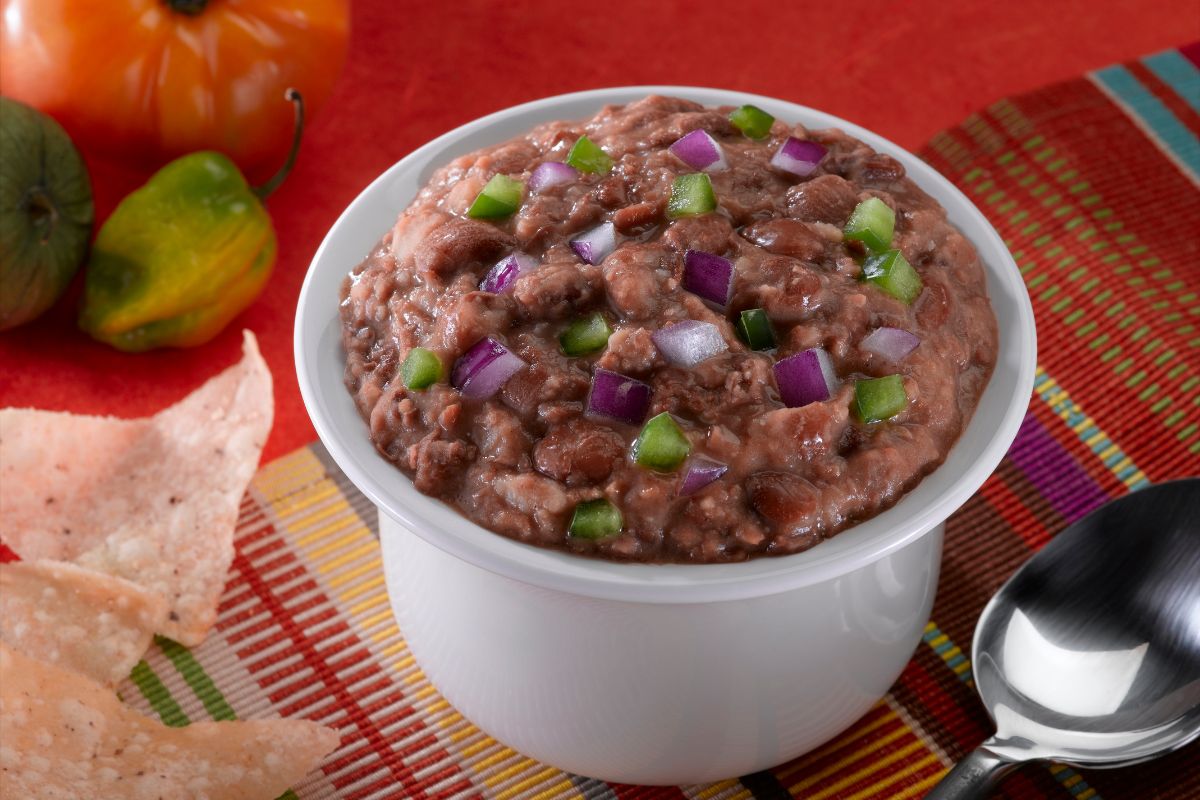
Mexican Bean Chilli
Alternatively, you can make a chili with the beans, adding things like beef mince, peppers, chipotle paste, and more.
Final Thoughts
There you have it! Canned refried beans on their own are thick and bland, but you can make them deliciously creamy and smooth like your favorite restaurant with these simple tricks and recipes.
1. Heat your fat or oil in a skillet or medium saucepan, using medium-high heat.
2. When the fat or soil sizzles, add your spices for blooming. Lower to medium level heat. Stir the spices for 3 minutes, letting them bloom.
3. Add jalapeno slices or garlic powder/smashed garlic cloves. Lower heat to low and cook for 2-3 minutes.
4. Add your 30 ounce canned refried beans, stirring them into the spices and fat or oil.
5. Add your thinning liquid or heavy cream into the mix, using 1 cup of it for every 30 ounces of refried beans. Stir thoroughly.
6. Cover the pan with a lid and heat on medium-low level of heat for 5-6 minutes. The cream will begin bubbling and the beans will become hot. Remove the lid at this point and stir the mixture, mixing the cream properly into the beans.
If it doesn’t stir easily, add more liquid. Put the lid back on the pan.
7. Lower to low heat and cook for 5 more minutes. When the beans bubble, add a hint of lime juice, then stir more. When the cream has completely incorporated into the beans, put the lid back on. Heat for a further 2 minutes.
8. Turn the heat off and carefully remove the pan, pouring the mixture into a bowl.
9. Add your chosen garnishes, such as shredded or crumbled cheese and salsa. Serve with tortilla chips, sour cream, or whatever you want. Enjoy!
Have you ever made something so delicious that you wished you could savor it forever?
Only to find that the recipe has now mysteriously vanished from your phone and the entirety of the internet. Yep, there’s not much more painful than that.
Hi, my name is Mark Williams and I have been infatuated with cooking since I was young. I would beg my mother to pull a chair up to the counter so I could watch what she was doing.