Sometimes, a trip to the grocery store can just seem too arduous, and this actually opens up a window of opportunity to start getting creative.
Many of you reading this article will already have made biscuits in the past, and as a result, you probably consider buttermilk to be an essential ingredient.
But, buttermilk is also an ingredient that we don’t often have in our refrigerator unless we’ve bought it for a specific purpose.
You probably believe that this means that you can’t whip up your favorite tasty treats, but this simply isn’t the case. We’ve compiled this handy guide that tells you exactly how to make them without reaching for this ingredient.
The best thing about this recipe is that it’s super tasty, easy to whip up, and most importantly, it tastes just like the regular version.
To find out how to make buttermilk biscuits without the buttermilk, simply keep reading below, as we take a closer look.
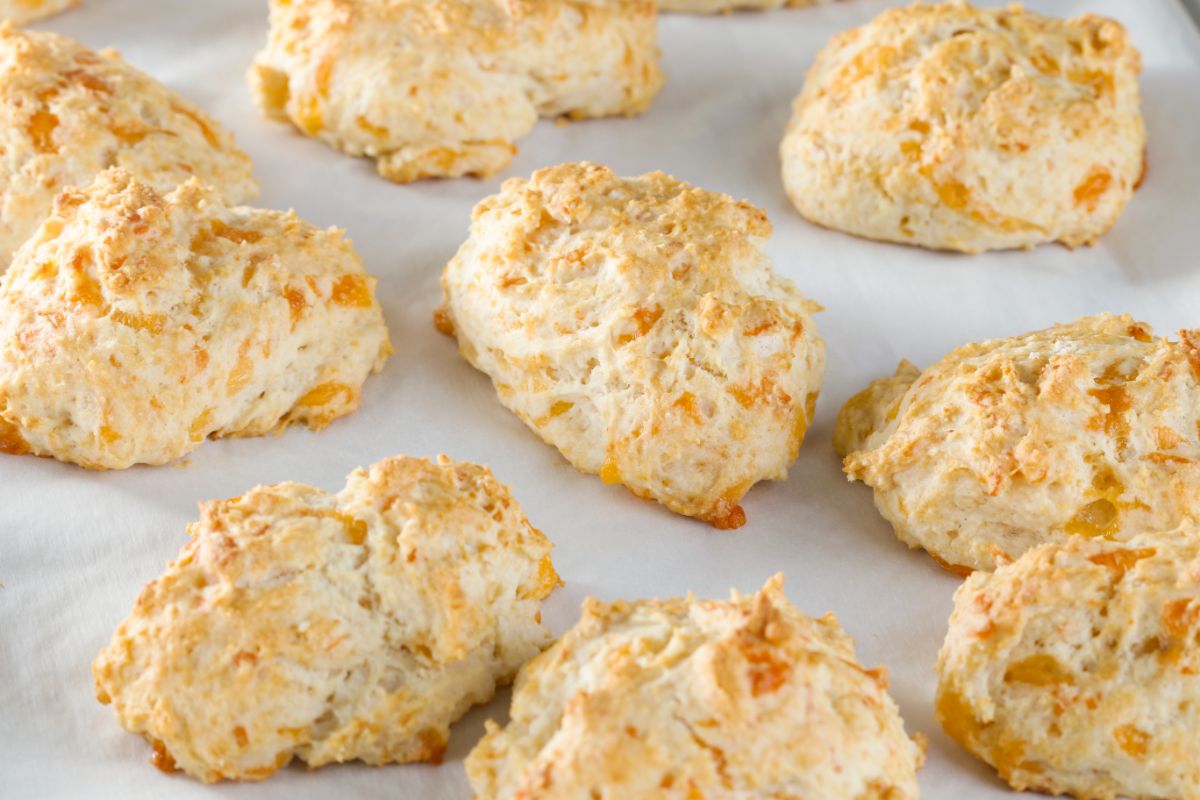
How To Make Biscuits Without Buttermilk
Now, why don’t we just jump straight in and show you how to prepare these delicious biscuits.
Below, we’ve compiled a list of all of the ingredients you’re going to need in order to get started, as well as providing you with the method you’ll need to follow. To find out more, simply keep reading below.
Ingredients
180ml Milk
2 Tsp Baking Powder
1 Tsp Sugar
½ Tsp Butter
½ Tsp Salt
2 Cups All Purpose Flour
Method
Step 1
In order to get started with making your delicious biscuits, the first thing you’re going to need to do is to gather together all of the ingredients.
In order to make these, you’re going to need to reach for a large bowl in order to mix your ingredients together.
To your bowl, you should add in all of your dry ingredients. These include salt, baking powder, sugar, and flour. As always, make sure that you’ve sifted your flour first so that the mixture doesn’t turn out lumpy.
After you’ve added all of the dry ingredients in, you can go ahead and whisk these together until they’re thoroughly combined. You want to make sure that all of the ingredients are distributed evenly throughout the mixture.
Step 2
For your next step, you’re going to need to add in your butter. Make sure that your butter has been left at room temperature, so that it’s soft enough to mix into the dough mixture.
You don’t want to take it right out of the refrigerator, and it can become very clumpy and difficult to combine with the other ingredients.
Mix in your butter using your hands, and make sure that you’re really breaking it up in the mixture. If there are little lumps in the dough from the butter, don’t worry too much about this, so long as most of it is combined and evenly distributed.
Now that you’ve added in the butter, you can go ahead and also add in your milk. Add this in gradually, and as you place it in the mixture, make sure that you’re stirring it throughout.
In order to mix it, you can simply use a regular fork, which you can press down on the mixture with.
After you’ve added in the milk, and you’ve pressed all of it down thoroughly with your fork, you should check out the consistency of your mixture. At this point, the mixture should have formed a dough like consistency, and shouldn’t be crumbly at all.
Step 3
For our next step, we’re going to be making our dough balls. In order to do this, you’re going to need to lightly dust the surface that you’re working on with some flour.
Make sure that you’re not sprinkling too much flour on there, or it could incorporate into the mixture, and leave you with very dry biscuits.
After you’ve floured your surface, you can then go ahead and place your biscuit dough on the countertop.
Here, you’ll begin to work your dough, pressing down on it with your fingers in order to create a ball. Kneading the dough also helps to avoid any crumbly bits, and incorporates everything together.
After you’ve kneaded it a little, you’re then going to need to produce a flat square. It’s going to need to be fairly flat, but we’d recommend that you use your fingers to do this rather than a rolling pin.
When you use a rolling pin, it can actually get rid of all of the air built up in the dough, and cause them to be very flat when taken out of the oven.
After you’ve formed the square using your hands, you’re then going to need to take a knife, and cut it into four equal parts.
When you’ve cut the dough into these parts, you’re then going to need to stack them, so that one is lying on top of the other.
After you’ve done this, then you can go ahead and squish the dough down again. After you’ve done this, you’re going to need to repeat the same process, and cut it into four equal parts once more.
You will then need to do the same as you did before, and stack them on top of each other. Finally, flatten this down using your hands, until the dough is about an inch thick.
Step 4
For the next part of the process, you’re going to need to go ahead and grab your biscuit cutter. If you don’t have one of these, then a glass will do just fine too. In order to get the most out of your dough, try to cut them as closely as you can to one another.
This recipe should provide you with approximately 8 biscuits in total.
After you’ve cut them all up, then you can go ahead and place them on top of your cast iron skillet. Don’t worry if they’re all closely packed together.
If you don’t have a cast iron skillet, don’t worry, because you can use a baking tray too. If you have the option, choose a smaller baking tray, because the biscuits rise better when they’ve packed closely together.
You also don’t need to worry about greasing your tray. This isn’t a sticky mixture, and you should have no trouble removing them from the tray or skillet once they’re done cooking.
Step 5
The next step is the fun part, and actually involves baking your biscuits. In order to make sure that they turn out perfectly, make sure that you set your oven to 450 degrees.
They shouldn’t take that long to bake, and they usually require approximately 15 minutes in total. Of course, each oven differs, and you’re going to need to check on their progress throughout to see how they’re doing.
Step 6
This is the final step toward making the perfect homemade biscuits without the buttermilk. Once they’re out of the oven, you can then go ahead and take a glazing brush, and layer on some melted butter so that they’re super soft.
This is a great finishing tough, and makes your biscuits even moister and tastier.
Frequently Asked Questions
Now that we’ve taken a closer look at how you can prepare the perfect biscuits minus the buttermilk, we can move on to our FAQ.
This is a great one to look over, because it helps to instruct you on different aspects of the biscuit making process, as well as providing you with tips and tricks for storage.
To find out more, keep reading below.
Why Is It So Important That My Biscuits Are Stacked Closely?
You may have noticed that from our recipe above, it’s important that you always stack your biscuits closely together. Choosing a skillet or baking tray that isn’t too large, and allows you to pack your biscuits close to one another is always optimal.
The reason why is because it helps them to rise. This may seem counterintuitive for many people, as with baking, we’re often told to separate each item so that they don’t meld together.
This isn’t a risk with biscuits however, and by stacking them closely, they will begin to push upward instead of outward, and as a result, will become much taller.
If you’ve tried making your biscuits in a large skillet before, then you’ve probably realized that they look a little strange. Because they don’t have anything next to them to support one another, they will slant sideways as a result.
What Should I Serve My Biscuits With?
Some of you reading this list might be wondering what the best things are to serve your biscuits with.
Traditionally, biscuits are used as a side dish for several different mains, most of which are gravy based. Biscuits go particularly well with white gravy, and some kind of meat and vegetable component to accompany them.
Many people will also have them with meatballs, corn pudding, or fried chicken.
When it comes to biscuits however, you’re not limited to just having them as a side dish. If you want to make them the star of the show, then you can absolutely do so.
You can turn them into a fun savory lunch by adding some cheese or meat inside of them.
Or, you could transform them into a sweet treat with some jam and peanut butter. In the UK, they like serving biscuits with strawberry jam and clotted cream.
They also make a great breakfast dish, and go quite well with bacon and sausages. You can really eat them alongside pretty much anything.
Will Buttermilk Work In The Recipe Above?
Some of you will have stumbled across this recipe by accident, and will already have buttermilk in the refrigerator. If this is the case, you’re probably wondering whether or not buttermilk can replace regular milk within this recipe.
The simple answer to this question is, yes. You can absolutely replace the milk in this recipe with buttermilk. We would recommend, however, that you add a touch more baking soda into the mixture if you’re using buttermilk.
In addition to this, you may even find that you need to add in more buttermilk to the mix.
Because buttermilk, as you will already know, is far thicker than milk, you will notice that the dough might be a bit dense. In this case, adding more buttermilk will help it to become softer and fluffier.
Do These Biscuits Taste The Same As Regular Buttermilk Biscuits?
Some of you reading this article might be wondering whether or not the recipe above makes biscuits that taste just like the real deal.
The answer to this question is yes, they taste just as delicious as the regular buttermilk based biscuits we all know and love.
The only difference between the two is that you might notice that these are a little sweeter. Because buttermilk has a little bit of a sharp taste, this adds a tanginess to the biscuits themselves. With this recipe, however, it’s much lighter and sweeter.
How Do I Store My Biscuits?
Those of you reading this article are probably wondering about the best way to store your biscuits, as well as how long they last for. When it comes to this recipe, you can store them at room temperature for approximately 2 days.
Make sure that you keep them in a cool and dry place, as this will help them to taste as fresh as possible.
You will need to cover them, however, with either some foil or saran wrap, as this will help to stop them from becoming dry. You can also keep them in the refrigerator, where they will last for approximately one week.
Final Thoughts
To sum up, it’s totally possible to make delicious biscuits without using any buttermilk. Make sure to follow the recipe above, and you’ll have perfect biscuits in no time.
Have you ever made something so delicious that you wished you could savor it forever?
Only to find that the recipe has now mysteriously vanished from your phone and the entirety of the internet. Yep, there’s not much more painful than that.
Hi, my name is Mark Williams and I have been infatuated with cooking since I was young. I would beg my mother to pull a chair up to the counter so I could watch what she was doing.