They have an incredible, sweet flavor that you just don’t get with other burger buns, and most importantly, they manage to reach that perfect consistency between being super soft, and dense too.
If you’ve tried a kaiser burger bun before, then chances are that you’ve purchased it in the supermarket. In terms of baking these yourself, some of you may have shied away because of the specialized shape that the bread has.
Well, we’re here to reassure you that once you get the hang of things, these buns honestly couldn’t be easier to make. The smell that they generate in your kitchen after they’re done is also glorious, and worth all the effort.
We can guarantee that the kaiser burger bun recipe that you’ll find below will taste better than any pre-packaged ones you’ve bought in the past.
To find out more about how you can make your own homemade kaiser burger buns, simply keep reading, as we take a closer look.
Kaiser Burger Buns: What Exactly Are They?
Now, before we jump straight in and start taking a look at our ingredients list, we’re going to be covering what kaiser burger buns are, for those who don’t know.
Chances are that some of you reading this article haven’t even seen these buns before, as they’re not as ubiquitous as brioche or bread rolls.
Well, if you hadn’t already guessed, kaiser rolls actually originate from Germany, where they continue to be popular today.
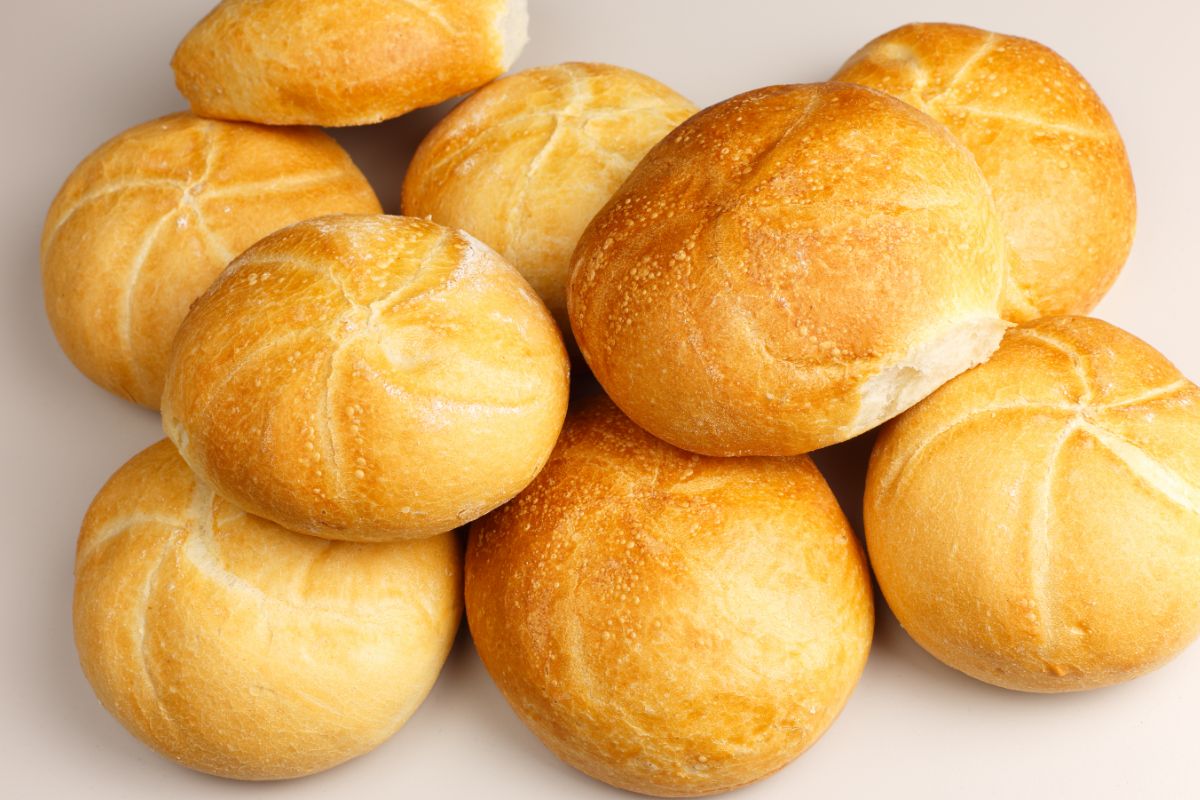
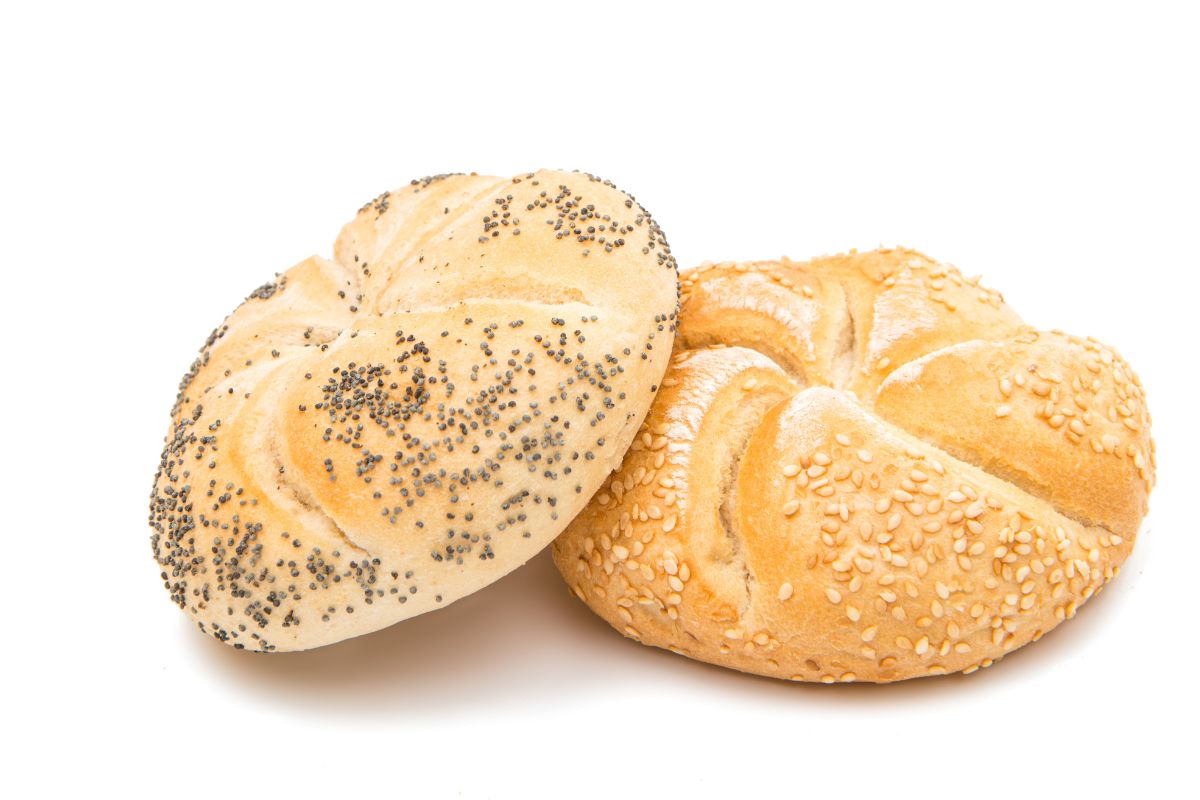
Kaiser rolls, despite being soft on the inside, have a deliciously crusty outer layer that makes them a pleasure to bite into. They’re made using white flour and honey, which are responsible for giving that super light and sweet flavor that we absolutely adore.
They are then divided into five sections, so that they demonstrate a symmetrical pattern. This becomes apparent after the buns have finished baking as it rises up. These buns can be topped with a number of different seeds, most commonly sesame seeds.
How To Store Kaiser Burger Buns
Another question that many of you are asking is how to store kaiser burger buns after you’re finished making them.
Once your kaiser burger buns have cooled down after the baking process, then we’d recommend that you put them in an area of your home that’s very dry and cool.
You don’t want to leave them out in the sun, as this can cause them to spoil much quicker and develop bits of mold.
They don’t need to be placed in an airtight container, but we’d recommend putting them on a plate, then covering them with some saran wrap to protect them.
If you’re wondering whether or not you can store these buns in the refrigerator, the answer is yes, absolutely. Storing these in the refrigerator will mean that they’ll last for longer, and they can be kept in there for a total of 10 days.
The only drawback of keeping them in the refrigerator is that they tend to become quite hard and dense, losing that fluffy texture in the process.
A way to tackle this problem is to place them in the oven for five minutes before serving, to help them regain that soft texture.
The good news is that these kaiser burger buns can also be frozen, so if you want to keep them for another time, you can do so.
In order to freeze your kaiser burger buns, you will need to wrap them each individually in some saran wrap, then you can place them in an airtight container. In the freezer, these buns should last for approximately 1 month.
After you take them out of the freezer, you’ll need to bake them for approximately 10 minutes so that they defrost thoroughly.
How To Make Homemade Kaiser Burger Buns
Now that we’ve covered what kaiser burger buns are, and have given a general overview of what they consist of, we can move on to our tutorial. Below, you’ll find a detailed list of instructions that show you how to make the perfect kaiser burger buns.
We urge you to follow this recipe as closely as you can, as with all bread based items, they can become tricky if you don’t follow them precisely.
To find out more, simply keep reading below, as we take a closer look at our ingredients list.
The Ingredients
50g Butter
10g Salt
5g Yeast
300ml Water
550g Flour
50g Sugar (or 50g honey instead)
The Method
Now that we’ve taken a closer look at the ingredients that will be required for our kaiser burger buns, we can move on to discuss the method that we’ll be following. Here, we’ve given a step by step breakdown of how to make your own kaiser buns from scratch.
Step 1
In order to get started with making your kaiser burger buns, the first thing that you’re going to need to do is gather together all of your different ingredients. After you’ve done this, you’re going to need to go ahead and grab a large mixing bowl.
Within this mixing bowl, you’re going to pour in your water. We’d recommend always using warm water when making bread, as it helps to activate the yeast. After you’ve poured in the water, you can then add in the sugar, salt, butter, and yeast.
Make sure that the butter is at room temperature when you add it in, so that it mixes in easily with the other ingredients.
You can then mix all of these ingredients together using a wooden spoon, making sure that they’re all thoroughly combined with one another.
Step 2
After you’ve mixed in these primary ingredients, then you can go ahead and add in the flour. Make sure that you’re doing this gradually, and combining it into the liquid mixture as you go.
As you mix it in with your hands, you’ll begin to notice that it’s forming a dough. This is what you’re looking for.
Prepare your surface by sprinkling a generous amount of flour to the surface and spreading it out, so that the dough won’t stick to the surface when you transfer it over.
After you’ve placed it on the worktop, you can then begin kneading the dough with your hands. You should aim to do this for about 10 minutes in total.
There is a little tip that we’d like to give you here so that your buns turn out as great as possible. After you’ve been kneading your buns for approximately 5 minutes, you will notice that they’ll start to get very sticky.
This is the time where a lot of people would be tempted to add in more flour, but we’d urge you not to do so, as it will affect the consistency of the bread once it’s baked, making the buns too dense.
Instead, we’d tell you to just power through this part of the process, as eventually it will lose that sticky quality, and become more cohesive again once that 10 minutes is up.
If you do find, however, that the dough is much too dense, and hasn’t become sticky at all during the whole process, then you can add a few tablespoons of water to the mixture.
After you’ve been kneading your bread for approximately 10 minutes, it should now be completely smooth, and you should be able to shape it into a round ball, without having any of it stick to your hands.
Step 3
For this bread recipe, you’re going to need to take the mixture that you’ve just made and shape it into equal sized bread rolls. With this mixture, you should be able to make around 10 bread rolls in total.
Most people when dividing up their bread rolls will just judge how much they require for each using their eyes. But, there is a better way to do this, and we’d always recommend weighing up your dough, then dividing that number by 10 to see how much you need for each.
If you want to, you can make more kaiser buns, as the recipe is enough to make around 15 smaller sized portions. However, the larger your buns are, the more fluffy they’ll be. So if large, fluffy kaiser rolls are what you’re looking for, then we’d recommend making them a bit bigger.
You’re going to want to take each of the portions that you’ve divided, and then roll them up into perfect little balls using your hands.
After you’ve done this, you’re going to want to cover them with a tea towel, and allow them to proof for approximately 10 minutes. You can leave them for longer if you need to.
This should cause the buns to expand in terms of size, and will help them to become super fluffy later on during the baking process.
Step 4
This step is the fun part, and is the bit where you get to create the shapes for your kaiser bread rolls. You’re going to be doing this using just your hands, and although it may seem complicated at first, it just takes a few practice runs to get right.
In order to shape your buns, you’re going to need to take each of your dough portions, and roll them into strips using your hands.
You should seek to make the roll long enough so that you’re able to wind it around itself. After you’ve done this, you can then go ahead and make a simple knot from the dough. Make sure that you’re as gentle as possible so that it doesn’t break off.
If you’ve managed to make it long enough, then you’ll notice that you have bits of dough poking out on either side of the knot. You’re going to want to wrap the tail over the knot, and push it through the hole.
Take the piece of dough sticking out on the other side and push this one through too. Make sure that on the underside of the dough that you’ve made sure it’s as flat as possible by patting it down gently with your fingers.
After you’re finished making your first knot, you can then go ahead and do this with each of the rolls.
You’re then going to want to line a large baking tray with parchment paper, and you can go ahead and place each of the bread rolls on top, spaced far enough apart from each other.
Step 5
After you’ve done this, your kaiser buns are going to need to be proofed again before they’re put in the oven to bake. In order to proof your kaiser buns further, then we’d recommend taking some saran wrap, and securing it down on each side of the baking tray.
How long these will take to prove will depend on the climate that you’re working in. For example, if your kitchen is super hot, then these may proof fully within just 60 minutes. If you’re working in a colder kitchen, then this could take a further half an hour.
Make sure that you give them enough time to proof fully, as this is pretty much the most important step in making sure your buns are perfect.
After they’ve proved themselves fully, and you’re satisfied that they’ve expanded all they can, then you can begin brushing your rolls with some egg mixture. If you don’t have any eggs, oil will work well too.
You’re doing this essentially to create a glaze, so that your kaiser buns aren’t too dry on the top, and it will also help to prevent them from burning when they’re in the oven.
If you want to, you can place some seeds of your choice on top of the buns, but this isn’t a necessity.
Step 6
For our final step, we’re going to be placing our buns in the oven, where they will bake at 256 fahrenheit for a total of 30 minutes.
The length of time that the buns take to bake will depend on the oven that you’re using too, so if you have one that gets particularly hot, then we’d recommend checking in on your buns after they’ve been in for approximately 25 minutes.
When they’re ready, you’ll know because they’ll have a golden brown finish on the top.
After they’re done baking, you can take them off the tray, and place them on a cooling rack for half an hour.
We’d recommend indulging in one of these buns whilst they’re still a little bit warm, and putting some butter inside to make them even more indulgent.
Why Is The Texture Of My Kaiser Bun Not Right?
Some of you will notice that when you first make your kaiser bread rolls, that they won’t be perfect like you expected. This is because baking is a process, and takes some adjustments so that you get things right the next time.
If you’ve noticed that your burger buns seem to have the correct consistency on the outside, but they’re too doughy on the inside, then this usually means that the temperature they were baked at was too hot.
This caused the outside to cook very quickly, whilst the inside didn’t have time to bake fully.
If your burger buns aren’t fluffy enough, and you’ve noticed that they’re a little bit hard after baking, this usually means that you have added too much flour during the process.
You shouldn’t use any additional flour when making kaiser buns, as it causes them to become super dense and hard.
You should also make sure that you knead them for the appropriate amount of time, 10 minutes in total, so that they’re super soft and combined.
Finally, make sure that you’re not leaving them in the oven for too long, as this will also cause your burger buns to become hard.
Final Thoughts
To sum up, making kaiser rolls couldn’t be easier than with this handy recipe. You can recreate one of your favorite treats in just 6 simple steps.
Make sure that you follow the instructions above as precisely as possible, so that your burger buns turn out just right. We hope that you have lots of fun making these.
Have you ever made something so delicious that you wished you could savor it forever?
Only to find that the recipe has now mysteriously vanished from your phone and the entirety of the internet. Yep, there’s not much more painful than that.
Hi, my name is Mark Williams and I have been infatuated with cooking since I was young. I would beg my mother to pull a chair up to the counter so I could watch what she was doing.