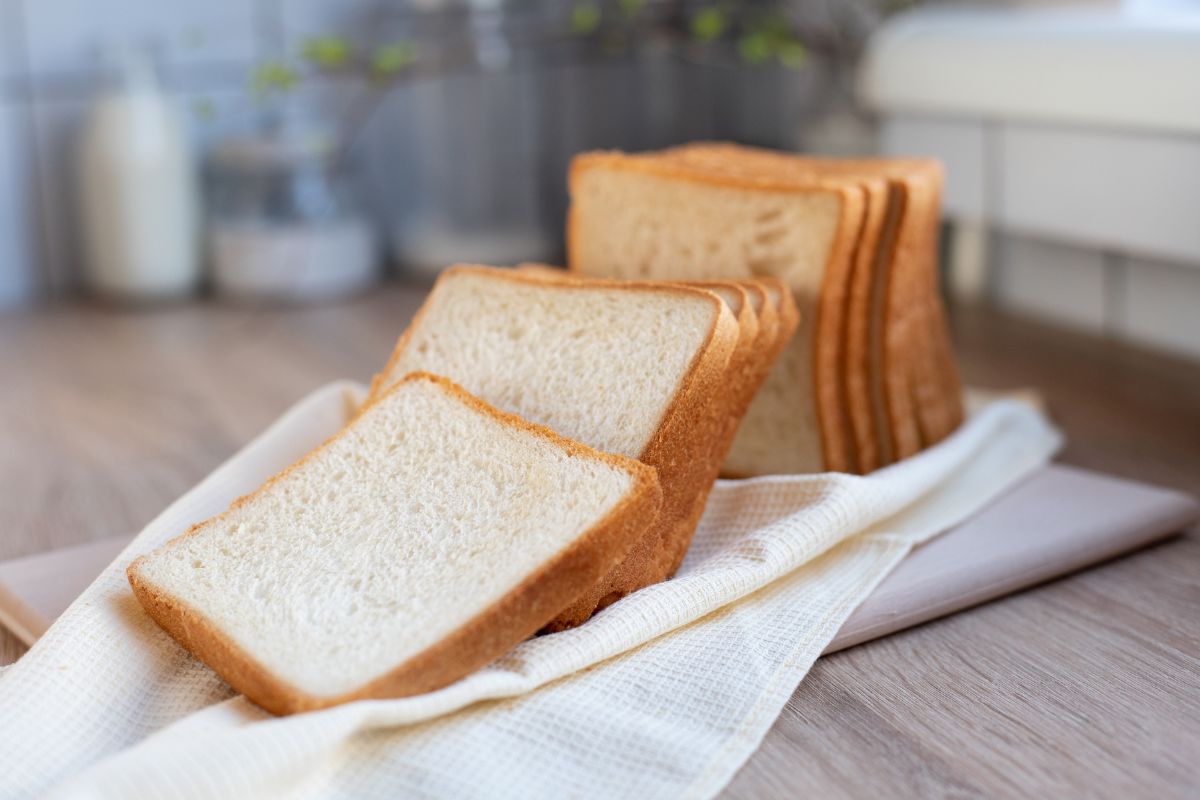
Here, the four corners are the distinguishing factor of this bread. The result is the perfect shape for your sandwiches.
With this in mind, this guide will explore everything you need to know about making Pullman bread.
Let’s get started.
What Is Pullman Bread?
You can use a loaf pan to make the perfect bread for sandwiches, however, for it to be considered Pullman bread, you need to have four perfect square corners.
This is one of the main defining characteristics of bread. The shape is the result of the loaf pan it is baked in, featuring a nifty sliding lid that ensures the perfect shape.
Here, you bake your bread with the lid on. This ensures that when the bread rises, it fills all four corners of the pan – making that perfect square shape.
It is said that this bread was invented by the Pullman railway company. Thanks to its shapes, they were able to stack the bread on top of each other to save space.
Moreover, once you have baked your Pullman sandwich bread, it should have a light, fluffy, and soft texture.
Therefore, with the help of this recipe, you’ll achieve the perfect bread that isn’t too limp or dense.
The Pullman Loaf
To make this bread, you’ll need a pain de mie pan, otherwise known as a Pullman loaf pan. This sturdy little bread pan is slightly longer and thinner than normal ones.
However, its most distinctive factor is its lid. Once you bake your bread, the lid helps to achieve the perfect rectangular shape. Likewise, it helps to form a thin, soft crust.
As briefly mentioned, the Pullman Loaf was named after a railroad company that manufactured sleeping cars.
Here, they had to serve a lot of breakfast, therefore, a lot of bread was needed. As a result, these loaves were created since they are easy to store and can be stacked like bricks.
That is where the name Pullman Loaf comes from.
Ingredients You’ll Need
Below, you’ll want all the ingredients you’ll need to make a delicious loaf of Pullman bread. These include:
Milk – For this recipe, you’ll want to make sure you’re using whole milk. Here, the fat contents allow for the bread to stay soft and feature a fine crumb.
Yeast – You can either use active dry yeast or instant yeast, depending on your preferences. Although, if you’re using instant yeast, just make sure to add it to your first cup of flour.
Unsalted butter – We decided to use unsalted butter to control the amount of salt in this recipe, however, if you prefer, you can use salted butter, too.
Water – If you live somewhere that has extremely chlorinated water or water that contains a lot of chemicals, then your yeast won’t be able to thrive. Instead, you should opt for spring water or bottled water.
Sugar – You can simply use plain granulated sugar. The sugar isn’t required for sweetness, instead, it is to provide the yeast with food and allow it to grow – making your bread rise.
Salt – In our recipes, we always use kosher salt. Although, if you’re using regular table salt, then you might want to cut back on the measurements since it contains a larger crystal.
Instant potato flakes – Potato starch also allows the bread to rise and provides it with that soft texture. That said, just make sure you’re using a plain one as opposed to a flavored one!
Nonfat dry milk – This can be added to a range of bread recipes to add flavor and extra nutrition.
Bread flour – This is one of the most important ingredients. Since it contains more protein (gluten) it helps the bread to rise, as opposed to all-purpose flour. Although, if you don’t have bread flour, all-purpose flour is perfectly acceptable, too – you’re unlikely to notice a difference!
What Does Pullman Bread Taste Like?
The Pullman load contains a mild and lightly sweetened taste that isn’t too “yeasty” with a velvety and delicate crumb that remains soft.
When it comes to using your bread, you’ll want to cut it about 1 ½ inches thick which works as the perfect toast base for a saucy topping or creamed chicken.
The best part? You don’t have to worry about this bread getting soggy. Moreover, it is the perfect bread for French Toast if you’re looking for something other than Brioche bread.
Tips For Making The Perfect Pullman Bread
This recipe is sure to become one of your favorites! However, to achieve the best results, you’ll need to make sure you’re cooking it to perfection.
As such, we have accumulated some tips when it comes to making the perfect Pullman bread. These include:
Make-ahead – If you’re able to, make this bread the day before and allow it to achieve its first rise in the refrigerator overnight. Then you can shape it.
Room temperature – Ensure that all your ingredients are at room temperature before baking, unless instructed otherwise.
Freeze – The best thing about this bread is that it is perfect for freezing. Here, you can slice it and freeze the slices between parchment paper, therefore, you can take it out and use it as you wish.
No Pullman loaf pan – If you don’t have the necessary pan, then don’t worry. You can also use a regular loaf pan, however, make sure you spray it very well using nonstick bake spray. Then, add approximately half of the dough to the pan and spray some aluminum foil with nonstick spray to seal the pan. Next, wrap the loaf pan tightly using aluminum foil. While it may not look perfect, it certainly works!
Whole wheat Pullman bread – You can make whole wheat Pullman bread by substituting whole wheat flour for half the bread flour.
Cool before cutting – Before slicing, ensure your bread is completely cooled. Here, you can choose to cut it paper thin or thick for recipes such as Texas toast – it is incredibly versatile.
Variations And Substitutions
You can transform this recipe to make individual bread rolls! All you have to do is omit step 5 and, instead, keep them on a large baking tray where they can double in size before being baked at a reduced time period.
You can substitute some strong white bread flour for strong whole wheat bread flour if you prefer. That said, just keep in mind that you may need more whole wheat flour since it absorbs more liquid.
How To Make Pullman Bread?
Ingredients
Water 315 ml (1 ¼ cup (240+60) + 1 tbsp)
Flour 500 g (4 cups, loosely packed)
Sugar 3 tbsp
Yeast 1 and ½ tsp
Butter 56 g (¼ cup or half stick)
Salt 1 and ¾ tsp
Method
1. Prepare The Dough
In a large bowl, add the yeast, water, salt, sugar, flour, and butter, and thoroughly mix together to create a mass of shaggy dough.
The water shouldn’t be too hot or cold, but slightly warm (the ideal temperature is around 110 degrees Fahrenheit).
Moreover, softening your butter at room temperature will make it easy to combine all your ingredients.
Likewise, you can also combine your flour in three parts – making it easy to combine everything together.
Then, you’ll want to transfer your dough to a clean surface and begin kneading it.
In the beginning, the dough should be really sticky, however, with about 6-8 minutes of kneading, everything should begin to come together.
You’ll want to continue kneading your dough until you’re left with a smooth and elastic dough. Here, the dough shouldn’t stick to your hands but, instead, should be tacky to the touch.
Essentially, the more hydrated and softer your dough, the softer your bread will come out.
Once done, the next step is to lightly oil a clean bowl and then add your dough.
Then, cover the dough with plastic film and place it somewhere warm.
If you have a stand mixer, this will be very advantageous when it comes to kneading the dough. However, kneading your dough by hand is just as acceptable, too.
2. Proof The Dough
The next step is to leave your dough to sit and sit until it has at least doubled in size. This may take around 1 and ½ hours.
Once your dough has finished rising, then you could transfer it to a lightly floured surface where you’ll need to degas the dough.
Then you can shape it into a rectangle.
3. Shape The Dough
Here, you’ll want to roll your dough the same way you would roll a jelly roll.
When rolling out your dough, you’ll want to keep in mind that your dough has to contain the same breadth as the length of your pan. Therefore, once rolled out, it should fit snugly inside.
Hence, roll out the dough, pinch all the seams together, and place it into your buttered loaf pan.
When it comes to your Pullman loaf pan, you’ll want the pan to be 21.1 x 12.2 x 11.9 cm (or 8 ¼ x 4 ¾ x 4 ¾).
4. Second Proofing
For the second proofing, you’ll want to cover the pan with plastic wrap and allow it to rise for about 45 minutes, or until the dough is approximately an inch from the top of the loaf pan.
Once you notice that your dough is halfway up the walls of the pan, then you can preheat your oven to 375 degrees Fahrenheit.
5. Bake The Bread
The next step is to grab your Pullman loaf pan lid and cover your dough.
Then, place your dough on the middle of the rack in the preheated oven.
At this stage, you’ll want to bake your bread at 375 degrees Fahrenheit for approximately 35-40 minutes.
Once your bread has finished baking, you’ll be rewarded with a perfectly square and golden-brown loaf.
How To Know Your Bread Is Done?
When it comes to baking duration, different ovens perform slightly differently. Plus, this can depend on the size of your Pullman pan, too.
Nonetheless, we have outlined everything you need to know below about the best baking durations for your Pullman bread.
These include:
Tapping the bottom – After removing your bread from the oven and taking it out of the pan, you’ll want to turn it upside down and tap the bottom with your thumb. Here, you should strike it as you would a drum. When it’s properly baked, your bread should sound hollow.
Visually – Your Pullman bread should be golden brown on all sides, not only the top. If the sides of your bread aren’t golden brown in color, then it is likely that the inside of your bread isn’t cooked properly. Therefore, here, you can bake it for a couple more minutes, and check the color again.
Take an internal temperature – In the center of the loaf, insert an instant-read thermometer. When the Pullman bread is done, the temperature should read closer to 200°.
When in doubt, it is always better to cook the bread for a little longer as opposed to having an undercooked loaf.
A few additional minutes are unlikely to burn the crust. Plus, the worst that can happen is your bread will be slightly dry, however, this is much better than having undercooked bread!
If you find that you’re always having trouble under or over-baking your loaves, then the problem could lie in your oven. Using an oven thermometer, check the temperature.
Temperature Is Important
At a high temperature, your Pullman bread crust will form too early. Plus, the inside of your bread won’t be able to bake properly, resulting in bread that is doughy in the middle.
At a low temperature, you’ll need to bake your bread for longer, which will result in a thicker crust.
Once you have finished baking your bread, you’ll want to remove it from the oven and take off the lid – allowing your bread to sit for 2-3 minutes.
If you’re looking for a softer crust, you can smear the top with butter.
Then, all you have to do is de-mold the bread and transfer it to a wire rack – allowing it to completely cool down before slicing it.
The result is the bread that is golden brown in color and features a soft, thin crust with a fluffy and white crumb inside.
Frequently Asked Questions
Can I Freeze Pullman Bread?
Yes! You can freeze Pullman bread. Here, all you have to do is wrap it in aluminum foil or plastic wrap to protect it from developing freezer burn. Then you can keep it for up to one month.
The beauty of keeping it in the freezer is that you can simply remove a slice whenever you need and place in it the toaster or in a preheated oven for around 10 minutes.
The result is fresh bread that is ready to eat.
How To Store Pullman Bread?
You can store your bread in a cool, dry place at room temperature for 2-3 days. Here, you’ll want to keep it in a paper bag or wrap it with plastic film.
You should keep in mind that humidity and heat will cause the bread to mold. Therefore, if you’re looking to keep it for longer, securely wrap it and place your bread in the fridge.
Here, when kept refrigerated, it will last up to seven days. That said, you should keep in mind that your bread is more likely to become dry when stored in the refrigerator.
What Is My Bread Heavy And Dense?
–The temperature is too cold or hot during the rise – For your yeast to grow, the optimum temperature is around 100 degrees Fahrenheit. That said, room temperature is just fine, too, however, you’ll need to allow your yeast more time to rise. –Your rise is too long or short – If your rise is too long, then the dough is likely to collapse onto itself. On the other hand, if it is too short, then the yeast won’t be able to create bubbles and Carbon dioxide to make the bubbles grow. –Lacks gluten – Your dough won’t be able to keep its shape if there isn’t enough gluten in the flour. This is usually the result of using whole grains, like whole wheat flour. In such instances, you can try adding wheat gluten or bread flour to your dough. –Yeast isn’t active – If your yeast isn’t active then you should try using another yeast.
Can You Make Pullman Bread Ahead Of Time?
After the second stage, you can store your Pullman bread dough in the refrigerator.
Likewise, after the first stage of proofing, you can keep your dough covered in the refrigerator for up to 4 days.
When you’re ready to bake your bread, remove your dough from the refrigerator and keep it on your kitchen counter at room temperature (usually this takes around 20 minutes).
Then, you can go and finish steps 3,4, and 5.
Once done, all you have to do is shape your Pullman loaf dough into the correct shape and place it in the loaf pan where it can rise (if the dough isn’t very warm, this may take longer than expected).
After, cover your Pullman loaf with its designated tin. Once the dough has risen near the top of the pan, you can place the loaf tin into your preheated oven.
Then all you have to do is bake your load at 375 degrees Fahrenheit for 35-40 minutes.
Why Isn’t My Bread Cooked In The Middle?
If your baking temperature is higher than the one outlined in the recipe, the result will be an outer crust that has baked more quickly than the middle – causing it to brown in only a few minutes.
As such, you’ll find the middle of your bread to be uncooked.
-If you take your bread out of the oven too soon (for instance, because the outside looks cooked), the result is a Pullman loaf that is lacking in flavor and has a gummy texture. -When your oven is too hot in the beginning, it will cause the crust to brown too early. Thus, your loaf won’t be able to expand to its maximum volume. As such, this will interfere with the texture of your bread on the inside.
To avoid this from happening, you should decrease the baking temperature and allow the bread to bake for longer to achieve a perfectly colored and baked Pullman bread.
Why Isn’t My Bread Rising?
If your bread isn’t rising, it is likely due to the yeast and its activity. Below, we have outlined some tips to help your bread rise.
-Before dissolving the yeast, make sure the water is at the ideal temperature (this is 110 degrees Fahrenheit). -Make sure to proof your yeast before using it. -Sometimes your dough can be too stiff as a result of too much flour during kneading or mixing. Instead, after mixing, your dough should be tacky, and after kneading, it should be smooth.
Does Cooling the Freshly Baked Bread Help Cook The Middle?
In a sense, yes, it does help. For the outside of the crust, it is just a process of cooling it.
However, when it comes to the crumb on the inside of the crust, the process is more complex. Essentially, what takes place is a continuation of what happened in the oven.
What Is “Carryover Baking”?
This refers to when the bread is removed from the oven and the temperature is able to equalize, creating a warm interior while the exterior is able to cool.
Why Is The Crust Of My Pullman Bread Thick?
If you find that the crust of your Pullman bread is too thick, this can be the result of a number of different reasons. Below, we have outlined some of the most common problems. These include:
–Oven temperature is too low – If the temperature is too low, you’ll need to bake your bread for longer, resulting in a thicker crust. -Kneading problems – Once you have finished kneading your dough, the finished dough should be ‘tacky’ as opposed to dry. –Your bread is overbaked.
Final Thoughts
If you’re looking to enhance your sandwich game, then you need to try making Pullman bread. Not only is it incredibly delicious but super simple to make, too.
All you need are a few simple steps and ingredients to create this delicious bread – you won’t want to go back to regular bread ever again!
Hopefully, with the help of this guide, you’ll be able to whip up a batch of Pullman bread in no time.
Have you ever made something so delicious that you wished you could savor it forever?
Only to find that the recipe has now mysteriously vanished from your phone and the entirety of the internet. Yep, there’s not much more painful than that.
Hi, my name is Mark Williams and I have been infatuated with cooking since I was young. I would beg my mother to pull a chair up to the counter so I could watch what she was doing.


")
