Watch a baker fill a pastry bag and it looks as easy as can be. But, when it comes to trying it yourself, you’ll soon realize that there is a certain art to it.
We’ve all been there when we’ve tried gripping the piping bag, but it’s too greasy and sticky to hold properly. You never see pastry chefs or bakers struggling, so what is their secret?
Well, we’re here to share some top tips and tricks on how to fill a pastry bag properly and mess free.
With a few simple techniques and a bit of practice, you’ll be able to achieve beautifully piped creations every time.
But, understanding the different components of a pastry bag, such as the bag itself and the piping tips, is crucial to achieving desired results.
Also, preparing your ingredients correctly and ensuring the right consistency of the fillings or icings can greatly impact the success of your piping.
So, let’s not wait any longer.
Join us as we delve into the world of pastry bag filling, sharing expert tips and step-by-step instructions that will help you create visually stunning and delectable treats.
Step One – Pastry Bag Preparation
The first step is to prepare your pastry bag.
Start by placing the tip you wish to use at the base of the bag.
This is an essential step many forget, but it’s often too late when you have filled a pastry bag with frosting and then realized you forgot to add the tip.
When using a new piping bag, cut off a little piece of the bag, enough for the tip to poke out halfway. If you cut too much off, the tip will just fall out of the bag.
Therefore, always cut less than you may think you need to be on the safe side. If you need a bigger hole, simply cut a little more off.
Whilst no specialized equipment is needed to fill a pastry bag properly, we do recommend investing in a coupler.
This is a two-piece tool that is inexpensive and allows you to change the tips easily without having to refill the bag. This is a great piece of it, especially if you plan to utilize several tips for a cooking or baking project.
Couplers are also useful when you have clogged tips. You just have to remove the tip, clean it, and replace it. Easy!
To use a coupler, insert the bottom of it into your piping bag as you would with a tip. Attach the piping tip you wish to use and secure it with a coupler ring.
Step Two – Filling The Pastry Bag
The next step is to fill your pastry bag.
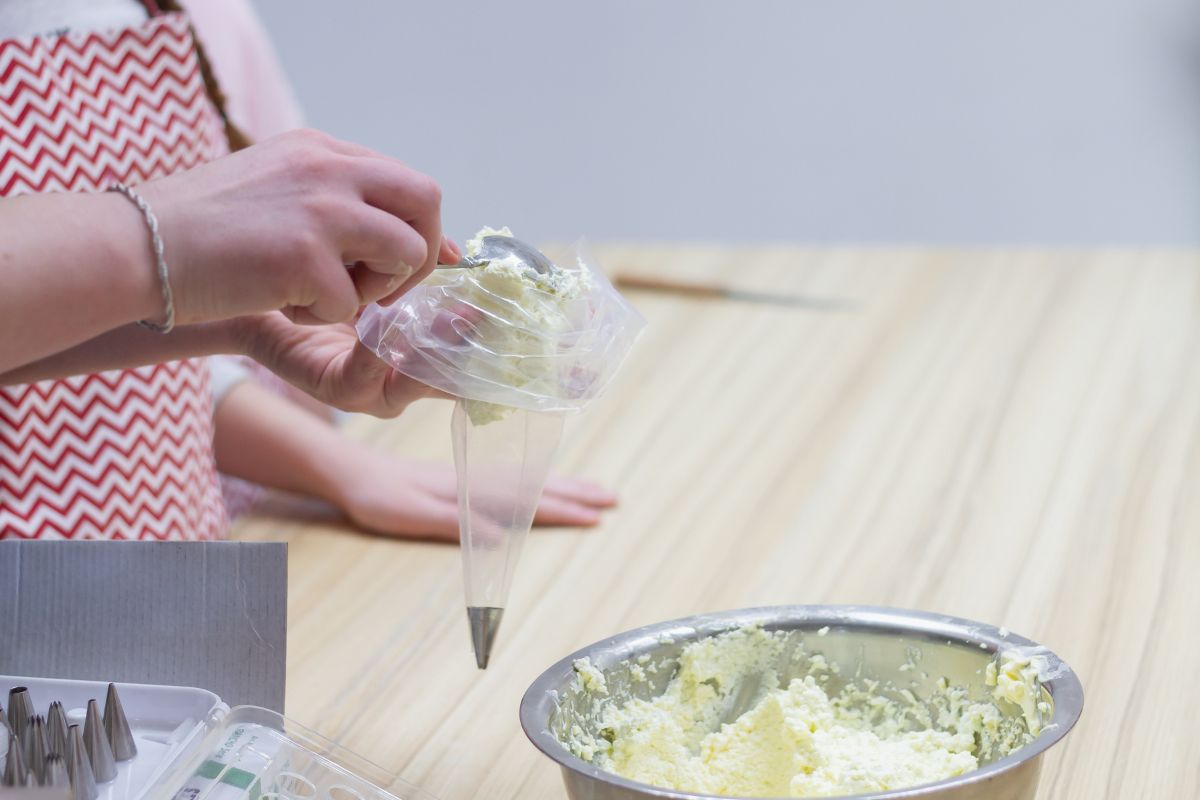
Begin by placing your piping bag into a drinking glass, such as a beer glass. Fold the bag’s opening down over and around the glass.
Doing this will help the bag stay open whilst you have two free hands to fill it. This method also keeps the outside of the bag clean and free of any pastry.
Now, using a spatula, add your filling or frosting to the piping bag.
When using a glass to fill a pastry bag, only fill the bag halfway up. If you fill it too much, it may be hard to control, and you stand a higher chance of making a mess.
Moreover, you’ll need to apply greater pressure when piping the bag if it is too full, meaning it will be harder to release the filling inside.
If your filling is especially thick, like ganache is, fill the bag as little as possible. If not, you’ll need to give your arm and wrist a good workout.
Step Three – Twisting And Piping
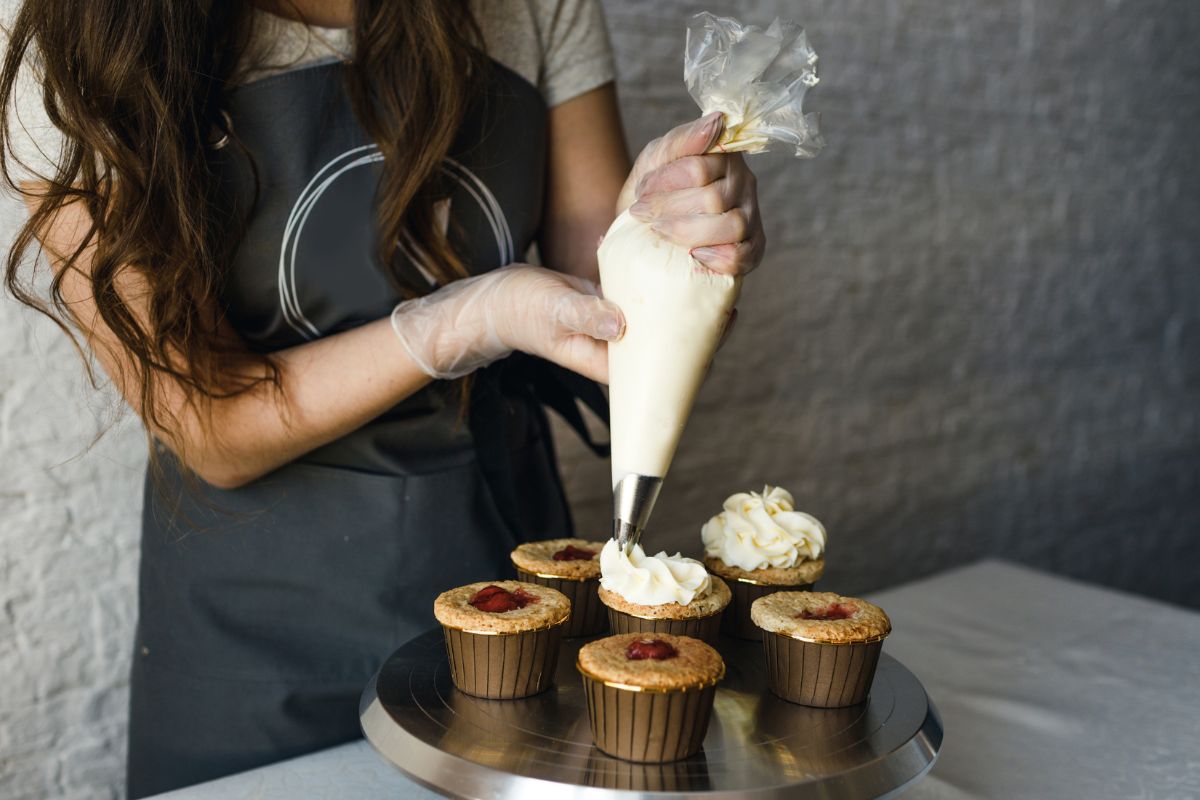
Once your piping bag contains filling, it’s time to twist and pipe the contents out.
Unfold the part of the bag that is wrapped around the tall glass and gather the remaining bag material. Twist this tightly and secure it.
You can use a rubber band to tie around the end of the bag, but it must remain twisted. This way, the frosting will not leak out of the pastry bag and make a mess.
An alternative technique used by some bakers is to wrap the twisted tail of the pastry bag around the thumb of their dominant hand, providing a more secure grip on the bag.
The last thing to do is to squeeze the pastry bag from its back gently and carefully.
If you squeeze from the font of the bag, the frosting or filling will start to seep out of the bag. Squeeze the bag, so the frosting is pushed down to the tip.
Now, you’re ready to pipe your frosting or filling.
Even at this stage, we recommend keeping your tall glass nearby. In between making frosted delights or when replacing tips, you can rest the piping bag tip side up within the glass.
Therefore, frosting or filling will not leak out onto the counter or surrounding surfaces.
And, that’s it. Now it’s up to you to pipe and design your cupcakes with flair.
How To Choose The Right Piping Tip
Piping tips for pastry bags come in a wide variety of shapes and sizes, each serving a specific purpose.
For instance, the small tip used to create borders on Christmas cookies differs from the tips shaped like stars used for piping adorable roses on Easter cupcakes.
When it comes to intricate decorations, opting for small piping tips is ideal.
There is a wide range of plastic and metal tips available, including plain, leaf, petal, and star shapes, suitable for piping various designs such as frosting lines on cakes, cupcakes, cookies, and more.
Smaller piping tips are also great for filling delicate desserts like éclairs with pastry cream or other fillings.
On the other hand, when frosting layer cakes or cupcakes and filling pastries or tarts, larger piping tips are preferred.
Starting with a star tip or a plain round tip is a perfect choice for most frosting and filling tasks in desserts.
Top Piping Tips
Here are some key tips to ensure you become a piping bag pro in no time at all!
Avoid exerting excessive pressure when piping frosting to prevent the tip from popping out. Take your time and work slowly, remembering that patience is crucial for achieving the best results.
When dealing with large quantities of frosting, using two bags is highly recommended. This involves filling two bags, both with frosting, and using one more empty bag with a piping tip.
In a pinch, you can use a plastic Ziploc bag as a substitute for a piping bag. Just snip off one corner of the bag, attach a tip, and fill it as you usually would. Keep in mind that Ziploc bags are not specifically designed for this piping, so be cautious not to overfill the bag or apply excessive pressure, as this increases the likelihood of the piping tip falling out.
In Summary
Using the technique discussed above, filling a pastry bag can be done easily.
It may take one or two attempts to master, but eventually, you will be filling piping bags and piping cakes, cookies, and other delights without even thinking.
Have you ever made something so delicious that you wished you could savor it forever?
Only to find that the recipe has now mysteriously vanished from your phone and the entirety of the internet. Yep, there’s not much more painful than that.
Hi, my name is Mark Williams and I have been infatuated with cooking since I was young. I would beg my mother to pull a chair up to the counter so I could watch what she was doing.